Connecting new merchants within your application
Use this topic if you’re an AffiniPay partner with customers who aren’t already AffiniPay merchants. Otherwise, see the Quickstart to decide how to connect based on your integration type.
Before you can perform transactions on behalf of your customers (who aren’t already AffiniPay merchants), you must submit merchant applications for them and, after they are accepted as AffiniPay merchants, you must connect to AffiniPay. You’ll:
- Configure your partner OAuth application.
- Request an access token so you can access account details for your merchant.
- Request gateway credentials so you can perform transactions on behalf of that merchant.
- Let your merchant know you’re running transactions on their behalf.
Note: Before you begin, see the best practices for AffiniPay partners.
1: Configuring your partner OAuth application
To configure your partner OAuth application:
- Log in to the web application that corresponds to the product you’re integrating into your application.
- For AffiniPay: https://secure.affinipay.com/login
- For ClientPay: https://secure.clientpay.com/login
- For CPACharge: https://secure.cpacharge.com/login
- For LawPay: https://secure.lawpay.com/login
- In the web application, click your name in the top-right corner and click Developers. (This part of the web application is available only to users with the Administrator or Developer role and to the merchant owner.)
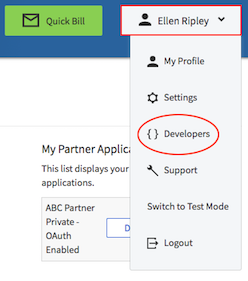
- The My Partner Applications section on the right lists your partner OAuth applications. Locate the partner OAuth application that corresponds to your application and click Edit.
 Note: If you don’t see any partner OAuth applications, ask AffiniPay Support to create one for you.
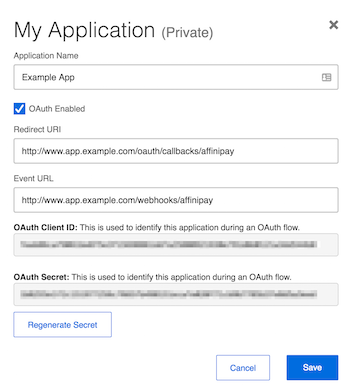
 - Set the application name. For current merchants, this is the name your customers see when they authorize your partner OAuth application to interact with their AffiniPay, ClientPay, CPACharge, or LawPay account.
- Ensure that OAuth Enabled is selected. OAuth is required for all integrations. Do not uncheck this checkbox.
Set the Redirect URI. Per the OAuth 2.0 specification, the Redirect URI is the URI to which the AffiniPay, ClientPay, CPACharge, or LawPay web application will redirect after successful authorization. Your web server must handle redirects to this URI.
- Set the Event URL, which is the endpoint on your server to which AffiniPay sends notifications and event details, such as merchant application disposition.
2: Requesting an access token
You must add your customer as an AffiniPay merchant. You’ll submit the application and obtain an access token using the OAuth 2.0 client credentials flow, which uses your partner OAuth application credentials.
Note: The OAuth client credentials flow is not the same as the OAuth flow you use for the Connect button for current merchants.
See the following diagram for a high-level description of the OAuth client credentials flow as it relates to AffiniPay:

- The partner's application requests an access_token using partner OAuth application client credentials (ID and secret).
- The Authentication API validates the client credentials and returns the access_token
- The partner's application can store this token and use it to submit a new merchant application to AffiniPay.
Run the OAuth client credentials flow
Before you can submit a merchant application, you must use the OAuth client credentials flow to request an access_token. This access_token will provide you access to the necessary API resources. This is not the same OAuth flow that’s used for the Connect button for current merchants.
Download an OAuth client library (such as one of these https://oauth.net/code/) and configure it using the following values:
- OAuth Client ID (from your partner OAuth application)
- OAuth Secret (from your partner OAuth application)
- Scope: tenant
- Grant Type: client_credentials
Your OAuth client library should provide a convenient way to send a POST request with the these parameters to the https://api.affinipay.com/oauth/token endpoint:
Example request
curl -X POST -H "Content-Type:application/json" https://api.affinipay.com/oauth/token -d '
{
  "client_id":"Y4QLWPO6wZag2ia8Abw7nbeLUAOgebDlfZGF1KyzgBaqAllzMtYFfP58jRxg5rp5",
  "client_secret":"4EG357enIs4m2SWKi9yfC3fQzIeOZmBTWr96ay47tqN4GUtRPYrWwxwCxwlZJbiC",
  "grant_type":"client_credentials",
  "scope":"tenant"
}'Example response
{
  "access_token":"IE83NL7SEGbLxT8UBWww78CSREhLsg5Yhf5fFu8znSpPh2BbBMvXPyQkZx5BU10C",
  "token_type":"bearer",
  "scope":"tenant",
  "created_at":1550789541
}
Use this access token to submit all merchant applications.
Building the merchant application object
Gather information from your customer through your application and build a merchant_application JSON object.
Note: You should ask users to verify their information before submitting the merchant application. Business information that doesn’t match IRS records can have serious consequences for the merchant.
Submitting a merchant application
Use [this] (https://github.com/thomasjbradley/signature-pad) jQuery plugin to capture an applicant’s signature and submit it in the merchant application JSON object. The plugin generates the value for the signature parameter in the required JSON format. See the plugin documentation for implementation instructions.
Then, POST the merchant_application JSON object to the endpoint that corresponds to the product you’re integrating into your application.
- For AffiniPay: https://secure.affinipay.com/api/v1/merchant_applications
- For ClientPay: https://secure.clientpay.com/api/v1/merchant_applications
- For CPACharge: https://secure.cpacharge.com/api/v1/merchant_applications
- For LawPay: https://secure.lawpay.com/api/v1/merchant_applications
Click here to see an example.
Configuring a webhook to watch for an authorization code
As soon as AffiniPay determines whether the application is approved or declined, we’ll send an event to the redirect URL you specified in your partner OAuth application. Configure a webhook to watch for this event.
Event details include an authorization_code, which you’ll need to exchange for an access_token that will allow your application to access merchant account details and manage transactions on the merchant’s behalf.
Requesting an access token with an authorization code
Your application server needs to use the <authorization_code> to request an <access_token>. Your OAuth client library should provide a convenient way to send a POST request with the following parameters to the https://api.affinipay.com/oauth/token endpoint:
Example request
curl -X POST -H "Content-Type:application/json" https://api.affinipay.com/oauth/token -d '
{
  "client_id":"Y4QLWPO6wZag2ia8Abw7nbeLUAOgebDlfZGF1KyzgBaqAllzMtYFfP58jRxg5rp5",
  "client_secret":"4EG357enIs4m2SWKi9yfC3fQzIeOZmBTWr96ay47tqN4GUtRPYrWwxwCxwlZJbiC",
  "grant_type":"authorization_code",
  "scope":"payments",
  "redirect_uri":"https://my.partner.redirect.domain/oauth/callback",
  "code":"EiKvFkJu6rcFwOMWSqW8bWIng6EMFVD93duwn1QhgQKDvmpbA97zWFN2AfC5052R"
}'Example response
{
  "access_token":"Msp2VL7SEGbLxT8UBWww7WUy33hLsg5Yhf5fFu8znSpPh2BbBMvXPyQkZx5TtWHd",
  "token_type":"bearer",
  "scope":"payments",
  "created_at":1464986958
}
Testing your application
You can add a test attribute to the merchant application JSON object to test your application. The test attribute has two possible values:
- validate. Upon submission, the AffiniPay system will validate the provided values. If invalid, it returns an HTTP 422 code as well as additional validation messages. If valid, it returns an HTTP 200 code with a fake merchant_application: ID in the response body. After a short delay, a merchant.provisioned event will be fired with a fake authorization_code.
{ "merchant_application": { "test": "validate", "reference":"", "plan":"your_app_plan_id", "first_name":"John", "last_name":"Doe", "email":"john.doe@example.com", // … additional fields omitted … } } - fail. Upon submission, the AffiniPay system will return an HTTP 200 if validation is successful, but will fire a merchant_application.declined event after a short delay. This can be used to test a successful submission but a failure to underwrite.
{
 "merchant_application": {
     "test": "fail",
     "reference":"",
     "plan":"your_app_plan_id",
     "first_name":"John",
     "last_name":"Doe",
     "email":"john.doe@example.com",
// … additional fields omitted …
 }
}
The short delays mentioned previously are for testing purposes only. In live deployment scenarios, these delays will be many hours (or days) long as the merchant application goes through underwriting.
Since test mode doesn’t actually create a merchant application, merchant, or user in the AffiniPay system, the “fake” authorization_code cannot be exchanged for an access_token.
Tip: You should use test mode until you’re ready to process live merchant applications. Processing merchant applications may require human involvement to finalize an underwriting decision.
3: Requesting gateway credentials
Your OAuth access token allows your application to make calls to the Authentication API at https://secure.affinipay.com/api/v1/ and the Payment Portal API at https://api.affinipay.com. The AffiniPay Payment Gateway API, however, requires separate credentials for access.
To request credentials to access the AffiniPay Payment Gateway API, send a GET request to the https://api.affinipay.com/gateway-credentials endpoint using your access_token.
Example request
curl -X GET -H "Authorization: Bearer <access_token>" https://api.affinipay.com/gateway-credentials
Example response
{
    "application": "Example App",
    "user": {
        "first_name": "Dave",
        "last_name": "Bowen",
        "email": "devsupport@affinipay.com",
        "owner": true,
        "abilities": [
            "admin",
            "charge",
            "schedule_charge",
            "refund",
            "tag_transactions",
            "view_reports"
        ]
    },
    "merchant": {
        "name": "Themyscira Associates",
        "address": "123 Main Street",
        "additional_address": "Suite 300",
        "city": "Austin",
        "state": "TX",
        "postal_code": "02360",
        "country": "US",
        "phone": "9789879878",
        "timezone": "Eastern Time (US & Canada)",
        "website": "http://www.example.com",
        "support_email": "support@example.com",
        "support_phone": "(978) 987-9878",
        "email_success_to": "admin@example.com",
        "email_failure_to": "admin@example.com",
        "reference_required": true,
        "reference_label": "New Reference Label Name"
    },
    "test_accounts": [
        {
            "name": "Operating",
            "type": "MerchantAccount",
            "currency": "USD",
            "recurring_charges_enabled": false,
            "id": "_DVA8TyeQ9qreE_a0vpv5w",
            "public_key": "m_7LwaBGj6T52TyR60xvjgzg",
            "secret_key": "tccsidx6bf3e15blzlbtztvkx6m2v39ulrstbg5c1fgtaykf9lyzkz9nb1fcavx",
            "trust_account": "false"
        },
        {
            "name": "Trust",
            "type": "MerchantAccount",
            "currency": "USD",
            "recurring_charges_enabled": false,
            "id": "Icw6sdURR_CGF3ch3zbfrQ",
            "public_key": "m_7LwaBGj6T52TyR60xvjgzg",
            "secret_key": "tccsidx6bf3e15blzlbtztvkx6m2v39ulrstbg5c1fgtaykf9lyzkz9nb1fcavx",
            "trust_account": "true"
        },
        {
            "name": "eCheck",
            "type": "AchAccount",
            "currency": "USD",
            "recurring_charges_enabled": false,
            "id": "P4L8ytrISoKp39xecKa_Nw",
            "public_key": "m_7LwaBGj6T52TyR60xvjgzg",
            "secret_key": "tccsidx6bf3e15blzlbtztvkx6m2v39ulrstbg5c1fgtaykf9lyzkz9nb1fcavx",
            "trust_account": "false"
        }
    ],
    "live_accounts": []
}
This API returns a list of the test and live accounts associated with the authenticated user’s merchant account. Included in this information are the keys you’ll use to make calls to the AffiniPay Payment Gateway API. Save these credentials securely so your application can manage transactions on behalf of this merchant.
4: Notifying users
Send an email to the new merchant letting them know payments have been activated for their account.
Next step
Next, you’ll embed a payment form or create a payment form.