Hosted payment pages
The easiest way to collect a payment online is to provide a link to one of our pre-built hosted payment pages. You can embed this link in your website or email it directly to a customer.
If you know a customer’s contact details, you can pre-populate those fields by manually or programmatically adding URL parameters to the link. When a customer navigates to the payment page, all they need to do is enter their payment details. You can even make pre-populated fields read-only so customers can’t make changes.
Link to a hosted payment page
To get a link to a hosted payment page:
- Log in to the web application that corresponds to the product you’re integrating into your website.
- For AffiniPay: https://secure.affinipay.com/login
- For ClientPay: https://secure.clientpay.com/login
- For CPACharge: https://secure.cpacharge.com/login
- For LawPay: https://secure.lawpay.com/login
- Click New Charge in the left menu.
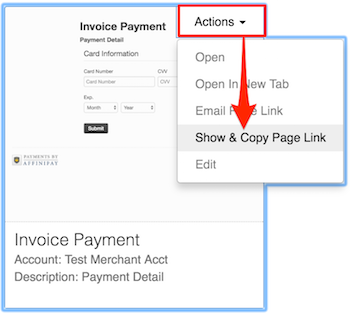
- Locate the payment page that you want to link to and click Actions > Show & Copy Page Link.
- Copy the link.
Note: Contact AffiniPay Support if you want your hosted payment page to redirect to your website after a payment is made.
Pre-populate form fields with URL parameters
Pre-populating fields on a hosted payment page requires you to add parameters to the end of the payment page URL. For example, the following URL pre-populates a payment page with a name and address:
https://secure.affinipay.com/pages/my-test-page/my-test-merchant?name=Dave%20Bowman&address1=2001%20Odyssey%20Ln&address2=Suite%20200&city=Austin&state=TX&postal_code=78727&country=US
Payment page URL parameters
Refer to the following table for a comprehensive list of URL parameters and how to use them. Some parameters may not work on payment pages that use custom fields.
| Parameter | URL Syntax |
|---|---|
| name | name=Dave%20Bowman |
| amount | amount=1000 |
| address1 | address=2001%20Odyssey%20Ln |
| address2 | address2=Suite%20200 |
| city | city=Austin |
| state | state=TX |
| postal_code | postal_code=78727 |
| country | country=US |
| phone | phone=5123214321 |
| reference | reference=1968 |
| email=devsupport@affinipay.com | |
| recur_frequency | recur_frequency=YEAR |
Tips:
- Precede the first query parameter with a question mark (?) and separate subsequent parameters with an ampersand (&).
- Be sure to follow UTF-8 encoding standards when building URLs. For example, to represent a space between characters, use %20.
- To prevent a user from modifying one or more pre-populated fields, add the following string to the URL: &readOnlyFields=. Comma separate multiple fields (e.g., &readOnlyFields=amount, reference, name).
Pass form data to a payment page
URL parameters are also useful in more complex scenarios, like passing data from one form to another. For example, you can use a custom page to collect customer contact details as part of a sign-up workflow, then pass those details to a payment page so your customers don’t have to enter the same information twice.
To pass data from one form to another:
- Create a custom HTML sign-up form.
- Create an event handler to build payment page URLs based on customer input and bind it to the HTML form action.
Create a sign-up form
Design and build a form to collect customer information. The information you collect depends on your workflow, but most commonly includes:
- Name
- Address
- Phone number
Note: You can only pass certain data to a payment page to pre-populate fields.
The following HTML is a basic sign-up form example based on the Bootstrap front-end framework. You must follow these additional guidelines when creating your own sign-up form: Don’t define any actions in your HTML form. Provide a button to submit customer contact information. Make sure <input> element name attributes match the syntax in Payment Page URL Parameters. Add event handlers and bind them to the submit form action. You’ll need at least two event handlers, one to store customer form input in your database and one to parse form input, add URL parameters, and open a link to a pre-populated payment page. This example focuses on adding URL parameters based on form input.
<!-- Include jQuery -->
<script src="https://code.jquery.com/jquery-2.2.4.min.js" integrity="sha256-BbhdlvQf/xTY9gja0Dq3HiwQF8LaCRTXxZKRutelT44=" crossorigin="anonymous"></script>
<!-- Include the example event handler -->
<script type="text/javascript" src="addUrlParameters.js"></script>
<h2>Enter your contact information:</h2>
<form id="sign-up">
  <div class="form-group">
    <label>Name</label>
    <input type="text" name="name">
  </div>
  <div class="form-group">
    <label>Phone</label>
    <input type="text" name="phone">
  </div>
  <div class="form-group">
    <label>Email</label>
    <input type="text" name="email">
  </div>
  <div class="form-group">
    <label>Address Line 1</label>
    <input type="text" name="address1">
  </div>
  <div class="form-group">
    <label>Address Line 2</label>
    <input type="text" name="address2">
  </div>
  <div class="form-group">
    <label>City</label>
    <input type="text" name="city">
  </div>
  <div class="form-group">
    <label>State</label>
    <input type="text" name="state">
  </div>
  <div class="form-group">
    <label>ZIP</label>
    <input type="text" name="postal_code">
  </div>
  <button class="btn btn-primary" type="submit" id="sign-up">Sign Up</button>
Create an event handler
You must add event handlers and bind them to the form action you’re using to register new customers (e.g., the Sign Up button). In this example, we’re using jQuery to:
- Build payment page URLs based on customer input.
- Open a link to a hosted payment page with pre-populated fields when a customer clicks Sign Up.
Note: You must write a separate event handler and bind it to the form action to store customer information in your database.
//Ensure the page has loaded before binding the event handler and enabling the sign-up button
$(document).ready(function () {
    var form = document.getElementById("sign-up");
    //Enable the sign up button in the form
    $(form).submit(function () {
        //Paste the link to your hosted payment page here
        var domain = "https://secure.affinipay.com/pages/test-page/test-merchant?";
        //Get URL parameters based on all form input fields. Replace '+' whitespace characters with '%20' to prevent + from appearing in pre-populated fields.
        var data = $(this).serialize().replace(/\+/g,'%20');
        //Open a new browser window and append parameters to the payment page URL
        window.open(domain + data);
        return false;
    });
});
Embed a hosted payment page with an iframe
To embed a iframe for a hosted payment page on your website, you must embed a script from AffiniPay, not just use an <iframe> tag.
To embed an iframe for a hosted payment page on your website:
Send AffiniPay Support your site’s exact domain name, including the http(s) scheme. If you need an http and an https version whitelisted, send both.
An AffiniPay administrator will enable iframes in your merchant account and send you a code snippet similar to the following example:
 First, add the following HTML element to the page:

 <div id="amp-embed"></div>

 Then, add the following JavaScript snippet at the bottom of the HTML's body:

 <script src="https://cdn.affinipay.com/libs/amp-embed.min.js"></script>
 <script>
   AMP.Embed.init({
     publicKey: 'm_Mv_JZ1wVQoPS7uDAQnIqAB',
     containerID: 'amp-embed'
   });
 </script>
Copy the code snippet sent by AffiniPay into your HTML file, in the location where you want to embed the iframe for the payment page.
- Log in to the web application that corresponds to the product you’re integrating into your website.
- For AffiniPay: https://secure.affinipay.com/login
- For CPACharge: https://secure.cpacharge.com/login
- For ClientPay: https://secure.clientpay.com/login
- For LawPay: https://secure.lawpay.com/login
- Click Charges and then Actions > Edit for the account into which payments will be deposited. Note the
pathfor your AffiniPay, ClientPay, CPACharge, or LawPay payment page. Contact AffiniPay Support if you need help determining the path.
To see your new page, go to the URL for the page that contains the iframe snippet and add ?page=path to the end (where path is the path you just looked up).
For example:
- If the URL is:
https://mywebsite.com/pay-now - And your path is:
myoperatingaccount - Then, the URL with the embedded iframe is:
https://mywebsite.com/pay-now?page=myoperatingaccount